

Zero to Hero – How to Onboard Microsoft Defender for Endpoint for Windows Clients – Complete Guide
Introduction
Welcome to the next step in your Defender journey. If you’ve read the previous articles on what Microsoft Defender XDR is and how Defender for Endpoint fits into the ecosystem, you already understand the concepts. Now it’s time to move from theory to practice.
This guide is the first technical deep dive in the Zero to Hero series. The goal: help you successfully onboard Microsoft Defender for Endpoint (MDE) in your client environments. From a single device to enterprise-scale deployments.
We’ll cover:
Prerequisites
Deployment strategies
Verification, troubleshooting and reporting
Onboarding Defender for Endpoint for Windows Clients
This guide focuses on Windows client operating system.
My goal is to provide a practical roadmap for deploying Microsoft Defender for Endpoint across client environments. Lets get into it !
Decision Guide for Client Deployment
Before you start onboarding, identify your environment architecture and align the rollout method accordingly. This section provides the decision framework
Prerequisites
This section provides the hardware/OS requirements, and network communication prerequisites, including the Streamlined Connectivity.
Harware & OS Requirements
Hardware (minimums for supported editions):
CPU: 2 cores (min), 4 preferred
Memory: 1 GB (min), 4 GB preferred
Microsoft’s minimums for Defender for Endpoint are documented at a high level in Minimum requirements; always keep devices on vendor‑supported OS with current security patches.
Supported client operating systems :
Windows 11 (Enterprise, Education, Pro, Pro Education)
Windows 10 (Enterprise, Enterprise LTSC 2016+, Enterprise IoT, Education, Pro, Pro Education)
Windows 8.1 (Enterprise, Pro) – limited functionality; legacy onboarding paths required.
Windows 7 SP1 (Enterprise/Pro)
Windows 365 / Windows Virtual Desktop (Azure Virtual Desktop)
macOS (Sonoma, Sequoia, Tahoe)
Linux (various distributions supported)
For more information take a look at: Minimum requirements for Microsoft Defender for Endpoint - Microsoft Defender for Endpoint | Microsoft Learn
Network & Connectivity
When it comes down to using Connectivity between Endpoint and Cloud, there are two options you come across: Streamlined vs. Standard.
Streamlined vs Standard Connectivitiy:
Microsoft now offers Streamlined Connectivity to reduce the URL set and simplify post‑deployment management. Instead of allowing dozens of service URLs, you allow a single consolidated domain.
If you are not using Streamlined Connectivity, ensure endpoints can reach the service URLs listed by Microsoft. Blocked connections will break cloud‑delivered protections and reporting.
| Service and description | URL |
|---|---|
|
Microsoft Defender Antivirus cloud-delivered protection (MAPS) Microsoft Defender Antivirus uses the MAPS service to provide cloud-delivered protection. |
|
|
Microsoft Update (MU) and Windows Update (WU) These services allow security intelligence and product updates. For more information, see Connection endpoints for Windows Update. |
|
|
Security intelligence updates – Alternate Download Location (ADL) This is an alternate location for Microsoft Defender Antivirus security intelligence updates if the installed security intelligence is out of date (seven or more days behind). |
|
|
Malware submission storage Upload location for files submitted to Microsoft via the submission form or automatic sample submission. |
|
|
Certificate Revocation List (CRL) Windows uses this list while creating the SSL connection to MAPS for updating the CRL. |
|
|
Universal GDPR Client Windows uses this client to send client diagnostic data. Microsoft Defender Antivirus uses GDPR for product quality and monitoring purposes. Updates use SSL (TCP 443) to download manifests and upload diagnostic data to the following endpoints: |
|
Proxy
You can use Microsoft Defender for Endpoint (MDE) behind a proxy. The configuration of proxy settings can of course differ from OS to OS.
Generally speaking, the MDE (Sense) sensor runs as LocalSystem and uses WinHTTP to communicate with Defender for Endpoint cloud services. WinHTTP settings are independent of WinINet (user browser) and can only discover proxies via:
Autodiscover: Transparent proxy or WPAD
Manual static proxy config: Registry or WinHTTP
For this article we will not go too far into proxy configurations. For a brief overview take a look here: Configure your devices to connect to the Defender for Endpoint service using a proxy - Microsoft Defender for Endpoint | Microsoft Learn
Verify Prerequisites
Before starting the rollout, I can be useful to confirm the prerequisites updates. A highly recommended tool for this step is the Microsoft Defender for Endpoint Client Analyzer.
Rollout Windows Client
Once prerequisites are met, the next step is choosing the right onboarding method. Microsoft Defender for Endpoint supports multiple deployment options to fit different needs. Choosing which method fits best for you check again the decisions flowchart above!
Local Script
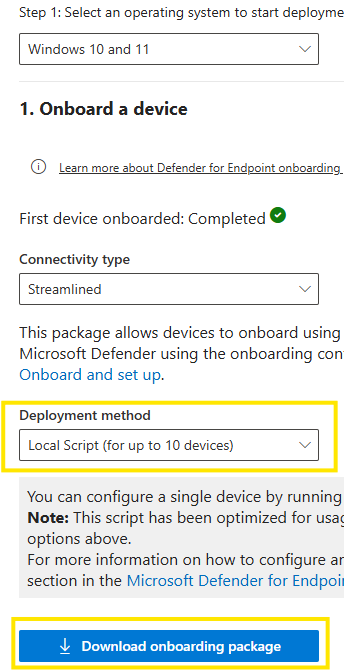
Use Case:
Small pilots or labs (≤10 devices).
Quick validation before enterprise rollout.
Step by Step
Download onboarding package from Defender portal -> Settings -> Endpoints -> Onboarding.
Unzip the package and run it with admin privileges on your target device
Intune
Use Case:
Cloud native or hybrid environment
Easy, scalable, automated and integrated into Microsoft ecosystem
Step by Step
Connect Intune with Microsoft Defender for Endpoint
In Microsoft Defender portal, go to:
Settings -> Endpoints -> Advanced Features -> Microsoft Intune connection
Enable the Intune integration within Intune.

In Microsoft Intune admin center, got to:
Endpoint Security -> Setup -> Microsoft Defender for Endpoit
Enable the connection

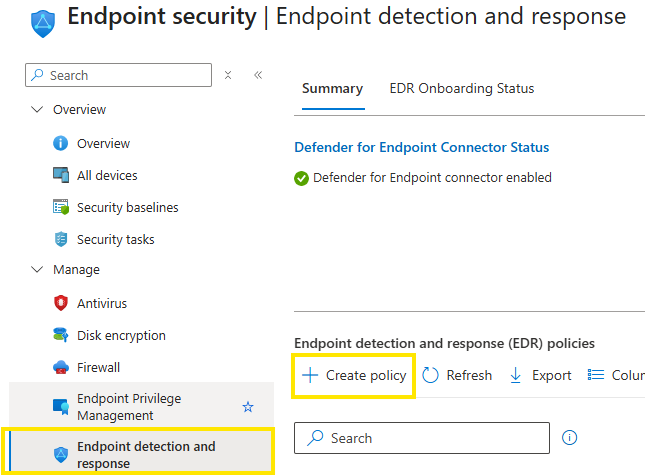
Create Onboarding Policy in Intune
Navigate in Intune admin center -> Endpoint security -> Endppoint Detection and Response.
Select Create policy -> Platform: Windows -> Profile: Endpoint Detection and Response.
Selet for “Microsoft Defender for Endpoint client configuration package type”: Auto form Connector
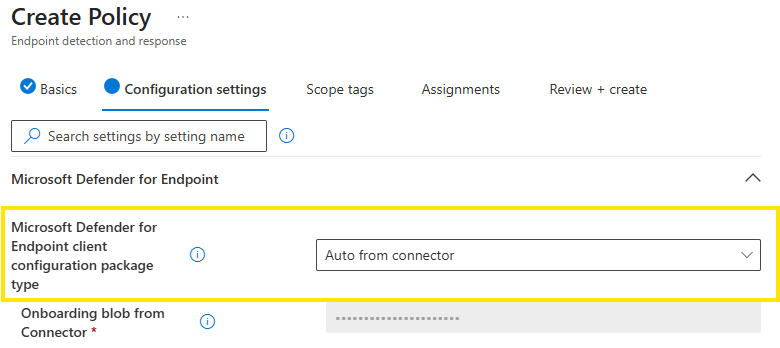
This will be used to onboard Intune managed machines, so onboarding script will be pulled automatically. Sample Sharing is part of Defender for Endpoint and is needed for sample sharing with Microsoft. To fully leverage Cloud benefits from MDE it is recommended to enable sample sharing.
Group Policy
Use Case:
Legacy/Traditional on-prem AD environments with no dedicated device management/MDM
Steps:
Download the Onboarding Package
Log in to Microsoft Defender portal: https://security.microsoft.com.
Navigate to: Settings -> Endpoints -> Onboarding.
From the drop-down list, select Group Policy and download the onboarding package.
This package contains the script that will be deployed via GPO.
Place the script on SYSVOL or another shared file server that is reachable from all domain controllers
Create the GPO
Open Group Policy Management Console on your Domain Controller.
Select the target Organizational Unit (OU).
Create a new GPO and link it to the OU.
Right-click the GPO and select Edit.
Configure Scheduled Task
In Group Policy Management Editor, navigate to: Computer Configuration -> Preferences -> Control Panel Settings.
Right-click Scheduled Tasks, point to New, and select Immediate Task (At least Windows 7).
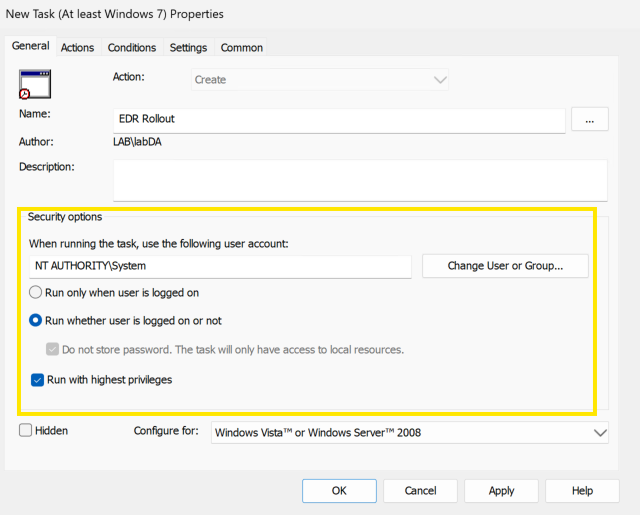
General Tab Settings
Under Security Options, click Change User or Group. Enter SYSTEM and click Check Names, then OK
The account should display as NT AUTHORITY\SYSTEM
Select:
Run whether user is logged on or not
Run with highest privileges
Actions Tab
Click New. Ensure Action is set to Start a program.
Enter the UNC path to the onboarding script (use the file server’s FQDN or SYSVOL path).
Example: \\fileserver.domain.local\share\Onboard-Defender.cmd
SCCM
Use Case:
Still often seen in large/enterprise on-prem or hybrid environments.
Steps:
Prerequisite:
Device Collection: "Device collection" is a logical grouping of devices that share common characteristics or criteria. These collections help SCCM administrators organize and manage devices in their environment more efficiently. Device collections are a fundamental concept in SCCM and are used for various tasks, such as software deployment, software updates, compliance settings.

Download the Onboarding Package
Log in to Microsoft Defender portal: https://security.microsoft.com.
Navigate to: Settings -> Endpoints ->Onboarding.
From the drop-down list, select Configuration Manager and download the onboarding package
Extract the content
Login to SCCM Console
SCCM Onboarding Policy
Create a Policy in Assets and Compliance -> Overview -> Endpoint Protection -> Microsoft Defender for Endpoint Policies
Create a new Policy
Upload the onboarding file with the Browse button
Again, specify the sample sharing
Assign the Policy to your device collection

(New) Deployment Tool (Preview)
UseCase:
Large-scale onboarding across Windows versions.
Environments without Intune
Modernize deployment for third-party tools or even replace classic methods like GPO/SCCM.
Supports streamlined connectivity and offline onboarding scenarios.
Supports onboarding Windows 7/Server 2008R2 with modern endpoint security solution (without MMA)
Additional Prerequisites required for down-level OS: Deploy Microsoft Defender endpoint security to Windows devices using the Defender deployment tool (preview) - Microsoft Defender for Endpoint | Microsoft Learn
Steps
Download the Onboarding Package
Log in to Microsoft Defender portal: https://security.microsoft.com.
Navigate to: Settings -> Endpoints -> Onboarding.
From the drop-down list, select Windows(Preview) and download the Tool together with the onboarding ZIP.
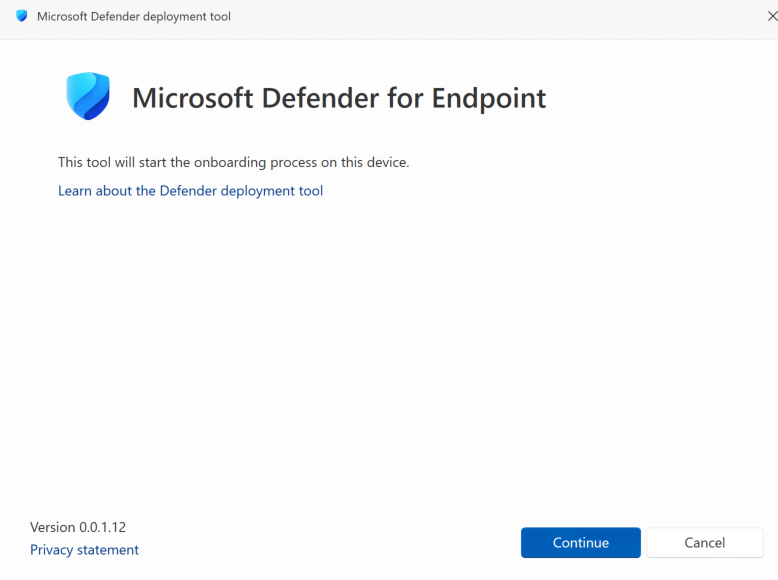
Interactive Deployment (e.g Single Device deployment)
Double-click the executable on the target device.
The tool automatically uses the WindowsDefenderATP.onboarding file in the same directory.
Follow the on-screen steps to onboard your device
Non-Interactive Deployment (Automation)
Quite Onboarding with onboarding file on fileserver
Quite Offboarding
Generate ConfigFile for reuse commandline options
For more information about the new deployment tool check out: Deploy Microsoft Defender endpoint security to Windows devices using the Defender deployment tool (preview) - Microsoft Defender for Endpoint | Microsoft Learn
Group Policy with new Deployment Tool (Preview)
Download the Deployment Tool as shown in the step above. DefenderdT.exe + WindowsDefenderATP.onboarding
Create the GPO
Same steps as in the classic GPO deployment. Check: Group Policy deployment above for further information.
Place the defenderdt.exe together with the onboarding file from the downloaded deployment tool on a accessible fileshare. It is recommended to also use the config file for automation deployment. Then…

In the actions Tab
Click New. Ensure Action is set to Start a program.
Enter the UNC path to the deployment tool (use the file server’s FQDN or SYSVOL path).
Example: \\fileserver.domain.local\share\ DefenderdT.exeAdd arguments: -file: \\server\share\WindowsDefenderATP.onboarding
Alternatively use the config file from the deployment tool
Verify Rollout
After onboarding, it’s important to keep an eye on that devices are successfully onboarded to Microsoft Defender for Endpoint.
Generally speaking, if the device appears in the portal as “Onboarded” your onboarding procedure was from a first point of view successful. Congratulations !

Detection test
Besides that, you can run a detection test on a single onboarded device to confirm connectivity and reporting:
A alert should appear within 10-15 minutes in the defender portal
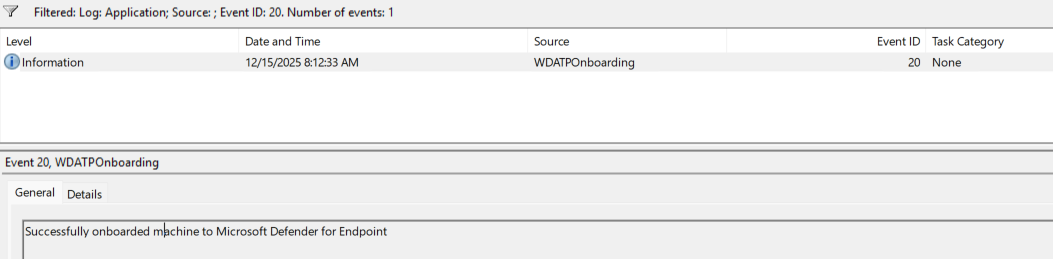
EventViewer
A practical way to confirm successful onboarding is by checking the Event Viewer. Look for Event ID 20 in the Application log, which indicates that the device has been onboarded to Microsoft Defender for Endpoint. This is a quick method to track onboarding progress locally.
Intune
If you’re using Intune, the portal provides a nice overview of onboarded devices. Navigate to the Endpoint security section in Intune to verify which devices have completed onboarding and are reporting correctly

Additional ways
For larger environments or advanced scenarios, you can leverage Microsoft Defender for Endpoint APIs, Advanced Hunting queries, or even BI tools to track onboarding status at scale.
Troubleshooting
Even with careful planning, issues can occur during or after onboarding. Of course first step is always, verify your chosen onboarding procedure applied the onboarding package correctly (gpresult, intune policy status…).
Device health report

One of my favorite reports in the defender portal…The Device Health report provides a centralized view of device health across your organization. (security.microsoft.com -> Reports ->Endpoints -> Device health)
It is an essential tool for troubleshooting because it provides a clear view of sensor health, operating systems, and Windows versions across your environment. It also delivers detailed antivirus health information, including mode, engine version, security intelligence updates, and recent scan results, helping you quickly identify issues.
MDE Client analyzer
The Microsoft Defender for Endpoint Client Analyzer is a powerful diagnostic tool for troubleshooting sensor health, connectivity, onboarding or any literally any kind of issue with MDE on an endpoint. This tool is especially helpful when the device is not showing up in the portal.
Run the Client Analyzer on Windows
Download MDEClientAnalyzer.zip from Microsoft.
Extract contents to a folder.
Open Command Prompt as Administrator:
Start -> type cmd -> right-click -> Run as administrator.
Run:
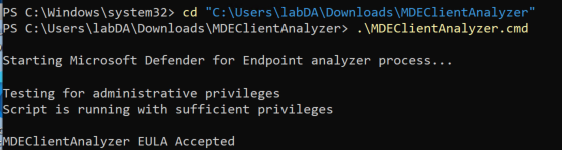
A look at the results will now reveal where your problem might be hidden…
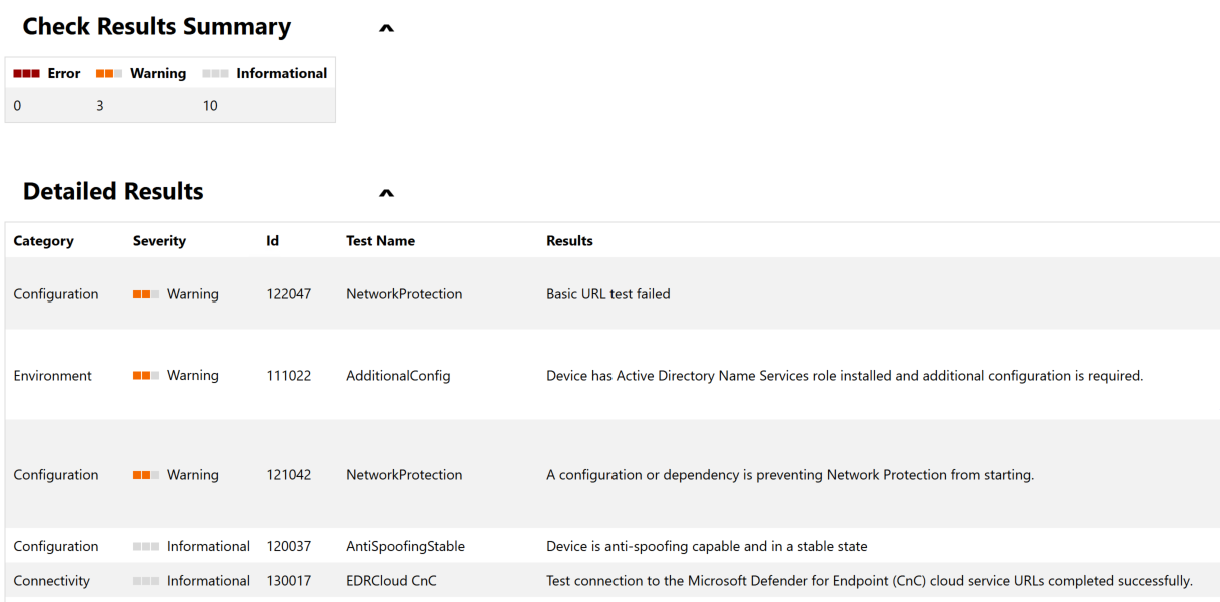
MDE client analyzer is one of the most useful tool when it comes down to troubleshooting mde. Most results are relatively self-explanatory. But for more information on how to interpret the results, take a look at: Diagnose Defender for Endpoint issues with Client Analyzer - Microsoft Defender for Endpoint | Microsoft Learn
Event Logs
Even though MDE client analyter already analyzes the event logs as well, the Event Viewer can provide valuable insights.
Applications and Services Logs -> Microsoft -> Windows -> SENSE -> Operational.
Filter the log for events to identify issues.
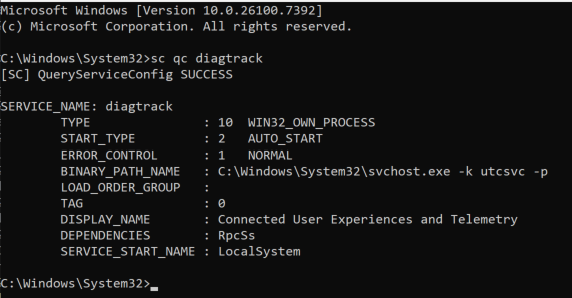
Diagnostic service
The Windows Diagnostic Data Service must be enabled for MDE for proper telemetry and reporting.
To check its startup type, run in elevated prompt:
If START_TYPE is not set to AUTO_START, configure the service to start automatically. This ensures diagnostic data is sent to Microsoft Defender for Endpoint services.
Conclusion
Onboarding Microsoft Defender for Endpoint on windows clients is the first step towards using MDE. With proper planning, checking prerequisites, choosing the right method, and verifying rollout…the process becomes smooth and scalable.
Next, we’ll focus on server onboarding. Stay tuned for the upcoming article.